L.M. REID and X. ZHU
Eastern Cereal and Oilseed Research Centre, Agriculture and Agri-Food Canada, Ottawa, Ontario
Corn can be attacked by dozens of different disease-causing organisms. Fortunately, the climate of Canada is not favourable for the development of serious epidemics, however, localized outbreaks of different diseases do occur every year. With the expansion of both grain and silage corn production areas, many of these pathogenic organisms will likely adapt to our cooler climate and agronomic practices. Most of the corn diseases in Canada are caused by fungi. The body of most plantpathogenic fungi consists of a mass of numerous threadlike hyphae called mycelium (often referred to as mould). Various other structures can be formed ranging from single cells such as asexual spores to large fruiting bodies which produce sexual spores. The asexual reproductive stage is usually associated with the mycelium while the sexual stage is usually associated with fruiting bodies. Spores can be produced from both stages and are the major means by which fungi reproduce and infect plants. Spore shape and size is often used to identify fungi along with the characteristics of the mycelium and fruiting bodies.
Fungi can attack all parts of the corn plant. Some fungi remain localized in the tissue that was first infected, e.g. the ear, while other fungi are systemic and can spread throughout the plant. All of these fungi have the potential to lower silage corn yields. Leaf diseases such as northern corn leaf blight result in a loss in dry matter weight and may affect the quality of the derived feedstuffs. The plant is killed before maturity, so that ears are not filled and have small kernels with low test weights. Leaf diseases may also weaken the plant and predispose it to more serious stalk and ear infections. Stalk lodging is a major factor contributing to harvest difficulties, reduced grain yields, and reduced dry matter production in corn. However, losses in quality can also occur when the fungi contaminate the grain or stalks with mycotoxins such as deoxynivalenol (DON, vomitoxin) or zearalenone (see Moulds and Mycotoxins section).
Leaf Diseases
Northern Leaf Blight (White Bast, Crown Stalk Rot or Stripe)
Causal Organism: Setosphaeria turcica (Luttrell) K.J. Leonard & E.G. Suggs [asexual state: Exserohilum turcicum (Pass.) K.J. Leonard & E.G. Suggs = Helminthosporium turcicum Pass.].
Symptoms consist of long, elliptical, grayish-green or tan coloured lesions appearing first on the lower leaves (Fig. 1). Lesions may be as large as 4 x 15 cm (1.5 x 6 in). When infection is severe, entire leaves die and it is difficult to see individual lesions; this is sometimes referred to as a “burning” or “scorching” of leaves. Lesions may also occur on husks. Kernels are not infected. A severely infected plant may turn grayish-green and die prematurely.
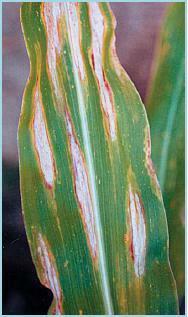
Figure 1. Typical symptoms of Northern corn leaf blight: long, elliptical, grayish-green or tan coloured lesions.
This has historically been one of the most damaging leaf diseases of corn in Canada. The fungus overwinters on corn debris. Spores are wind-borne up to 2 km (1.2 mi) under moderate temperatures (18-25°C or 64-77°F) and can also be dispersed by rain splash. Heavy dews favour disease development. Secondary infection can rapidly spread from field to field. The initial source of infection may be from spores blowing in from the U.S.
This fungus has seven races. Hybrids resistant to a single race or to all races are available. Crop rotation and tillage help to reduce surface residues and pathogen populations. Infected plants are more susceptible to stalk rots. Fungicide applications are not economical for silage corn.
Eyespot (Brown spot)
Causal Organism: Aureobasidium zeae (Narita & Hiratsuka) J.M. Dingley (= Kabatiella zeae Narita & Hiratsuka).
Symptoms on leaves consist of round-to-oval lesions (2-5 mm or .-¼ in diameter) with a tan-to-cream coloured centre and a brown (Fig. 2) or purple (Fig. 3) margin surrounded by a yellowish halo, giving the characteristic “eyespot” appearance. These lesions are easy to recognize if the leaf is held up to a light. The lesions may fuse to form large necrotic (dead) areas. The upper leaves may wither and die prematurely. Symptoms can be confused with non-infectious physiological leaf spots or insect damage found on some corn hybrids.
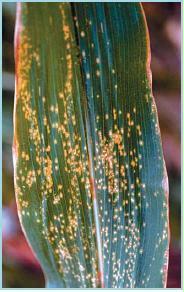
Figure 2. Eyespot lesions consisting of small round to oval spots with a tan or cream coloured centre and a brown margin. Note the yellow halo surrounding the spots, giving the appearance of an “eye”.
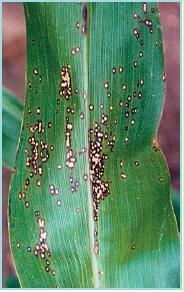
Figure 3. Eyespot lesions consisting of small round to oval spots with a tan or cream coloured centre and a purple margin.
The incidence of eyespot is increasing in Canada. The disease occurs during cool, wet weather in late August and September. The fungus overwinters in corn debris and spores are spread by rain splash and wind. Higher incidence in conservation tillage fields and when corn follows corn has been reported.
Resistant hybrids must be grown in areas with a history of eyespot. Crop rotation and clean ploughing are recommended to control this disease. Like most leaf diseases, infected plants are more susceptible to stalk rots. Fungicide applications are not economical in silage corn.
Common Rust
Causal Organism: Puccinia sorghi Schwein.
Symptoms begin as small discoloured flecks on the leaves that soon turn into small, round to elongate, reddish brown pustules full of red coloured urediniospores (Fig. 4). Pustules can be observed on both leaf surfaces as well as husks, leaf sheaths and stalks. The red spores can be rubbed off on hands or clothing. The pustules turn black as the plant matures (Fig. 5). Pustules are frequently clustered in bands around the leaves as a result of infection that took place when the leaf tissue was in the whorl. Younger leaves are more susceptible than mature leaves. When the disease is severe, leaf tissue around the pustules turns yellow, withers and dies. Some hybrids have resistance genes; these plants may develop a hypersensitive response consisting of several small (pin-prick) pale coloured lesions.
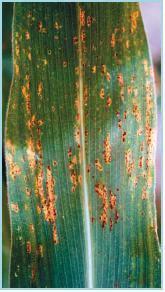
Figure 4. Common rust, the redbrown coloured pustules erupt releasing rust coloured spores during the summer months.
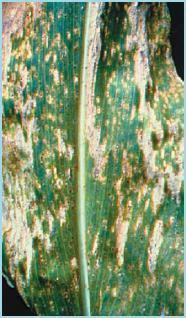
Figure 5. Late stage of infection of common rust in corn. The pustules are now more black than rust coloured and contain black teliospores.
This fungus does not overwinter in Canada (requires living plant tissue) and therefore, is dependent on spores that survive the winter in the southern U.S. and Mexico. These overwintering spores are carried by storm fronts to the corn regions of the U.S. and Canada. Rust prefers wet seasons with high humidity (above 95%) and warm temperatures (16- 25°C, 61-77°F).
For control of rust, use resistant hybrids. Early planting may allow the crop to develop to a less susceptible stage before spores are blown in. Cultural practices such as crop rotation and clean ploughing have no effect on disease incidence since the rust spores blow in from southern regions. Heavily infected plants are more susceptible to stalk rots. Fungicide treatments are not economical in silage corn.
Stalk Diseases
Gibberella Stalk Rot
Causal Organism: Fusarium graminearum Schwabe [sexual state: Gibberella zeae (Schwein.) [Petch].
Gibberella stalk rot infected plants may wilt and the leaves may change from a light to dull green colour while the lower stalk becomes dry and the pith tissue in the center of the stalk disintegrates to a shredded appearance (Fig. 6). Distinctive symptoms of gibberella stalk rot are a tan to dark brown discolouration of the lower internodes and a pink to reddish discolouration of the pith tissue. Bluish-black coloured perithecia (fungal fruiting structures that release sexual spores) or reddish-white asexual spores form on the stalk surface. Plants may lodge if the infection is severe.
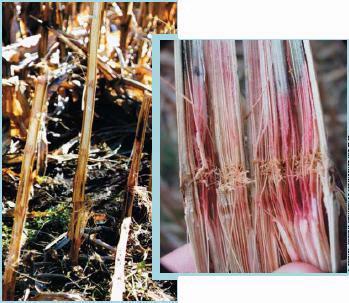
Figure 6. Gibberella stalk rot of corn. The lower internodes of the stalk turn tan to dark brown in colour and the pith becomes shredded and has a characteristic red or pink colour.
This fungus is one of the more potentially damaging stalk rotting agents in Canada. The pathogen survives in soil and on crop residue; spores are produced in wet weather and dispersed by wind, rain splash and insects or birds. Infection takes place through roots or through wounds in the stalk often shortly after pollination. Like most stalk rots, occurrence is strongly linked to stress during grain filling by any conditions that reduce photosynthesis and production of sugars (leaf diseases, drought or soil saturation, insect damage, hail damage, lack of sunlight, cool weather, etc.). Many stalk rot infections can be traced back to wounding of the stalk by boring insects such as the European corn borer.
Planting resistant hybrids, clean ploughing, crop rotation, avoidance of high plant populations and balanced soil fertility are some of the methods to control this disease. Since this fungus also causes scab in wheat, corn should not be rotated with wheat or other cereals susceptible to scab if this disease is present. Control of stalk boring insects is helpful (Fig. 7). Fields should be scouted 40 days after pollination by looking for symptoms and pinching stalks. When pinched, infected stalks are easily compressed or crushed. Fields should be harvested as early as possible if more than 10-15% of the stalks have rot because rotted stalks will lodge, making harvest difficult.

Figure 7. Corn borer entry hole for stalk rot.
Fusarium Stalk Rot
Causal Organisms: There are three main species responsible for fusarium stalk rot: Fusarium verticilliodes [= Fusarium moniliforme J. Sheld. (sexual stage: Gibberella moniliformis Wineland]; F. proliferatum (T. Matsushima) Nirenberg (sexual stage: G. fujikuroi var. intermedia Kuhlmann); and F. subglutinans (Wollenweb. & Reinking) Nelson, Toussoun and Marasas (sexual stage: G. subglutinans Nelson, Toussoun and Marasas).
Symptoms of fusarium stalk rot are similar to gibberella stalk rot. Plants may wilt, the leaves change from a light to dull green, the lower stalks dry and the pith tissue disintegrates to a shredded appearance. Brown streaks appear (Fig. 8) on the lower internodes and the rotted pith tissue may be whitish pink to salmon in colour as opposed to the distinct red-pink colour of gibberella stalk rot. Infected plants may lodge (Fig. 9). Symptoms usually appear late in the season.
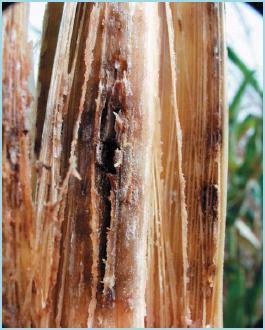
Figure 8. Fusarium stalk rot produces brown streaks in lower internodes.
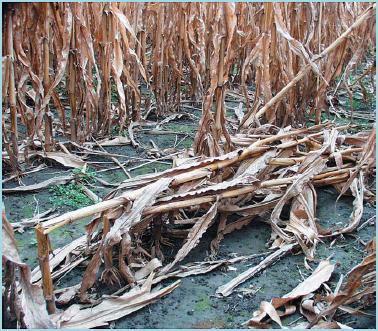
Figure 9. Fusarium stalk rot causes lodging.
This disease is more important in the warmer, dry areas of Canada such as southern Ontario. The pathogens survive in soil and on crop residue. Spores are dispersed by wind, rain, insects and birds. This fungus may also be present in the seeds or plants but with no apparent symptoms. Infection can take place through the roots or through wounds on the leaves or stalk. Like gibberella stalk rot, occurrence is strongly linked to stress during grain filling and often can be traced back to insect wounding of the stalk.
Control strategies are the same as for gibberella stalk rot.
Diplodia Stalk Rot
Causal Organism: Diplodia maydis (Berk.) Sacc. [= Stenocarpella maydis (Berk.) Sutton].
Like most stalk rots, Diplodia rotting symptoms include a disintegration of the pith tissue causing the pith to have a shredded appearance and stalks that are easily crushed or compressed when pinched. Diplodia stalk rot is characterized by numerous black pycnidia (flask shaped fungal fruiting structures that produce asexual spores) that appear as small dots about the size of a pinhead on the lower internodes of the stalk. The pycnidia are embedded in the stalk tissue and therefore, is unlike soil which can be easily removed. If conditions are wet, a white mould may appear on the surface of the stalk.
This fungus overwinters as spores on corn debris and as pycnidia or mycelium in corn seed. Incidence of this stalk rot are increasing in minimum tillage areas especially if corn follows corn in rotation. During wet weather, pycnidia produce spores that are dispersed by splashing water and wind. These spores infect the plant through the crowns, roots, and lower nodes. Insects may also carry the spores to plants and into feeding wounds. Dry conditions early in the season, followed by wetter conditions after silking, favour disease development. Like most stalk rots, occurrence is strongly linked to stress during grain filling.
Planting resistant hybrids, clean ploughing, crop rotation, and balanced soil fertility are some of the methods to control this disease. Fields should be scouted 40 days after pollination by looking for symptoms and pinching stalks. When pinched, diseased stalks are easily compressed or crushed. Fields should be harvested as early as possible if more than 10-15% of the stalks have rot, since rotted stalks will lodge, making harvest difficult.
Anthracnose Stalk Rot and Top-Die Back
Causal Organism: Colletotrichum graminicola (Ces.) G.W. Wils. (sexual state: Glomerella graminicola Politis).
Anthracnose stalk rot is characterized by the appearance of distinctive black streaks on the lower stalk late in the season. The pith turns dark brown and has a shredded appearance (Fig. 10). Numerous, black, spiny asexual fruiting bodies (acervuli) form on the surface of the dead tissue. Like most stalk rots, the most obvious symptom is a sudden death of plants before grain maturity. Since the leaves wilt and die after infec- tion, the plant has the appearance of being “frosted”. Another common symptom is lodging. If seedlings are infected, the plants may die before flowering. Top-die back refers to symptoms after the dough stage in which the top nodes, leaves and the tassel dry out, but the bottom leaves remain green and normal (Fig. 11).
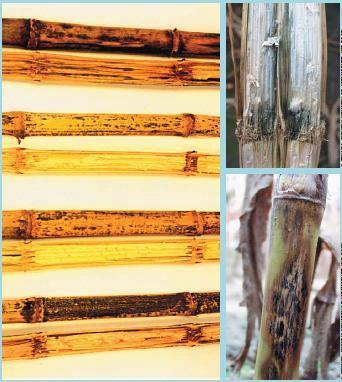
Figure 10. Anthracnose stalk rot of corn. Black streaks appear on the lower internodes and the pith becomes shredded and dark brown in colour.
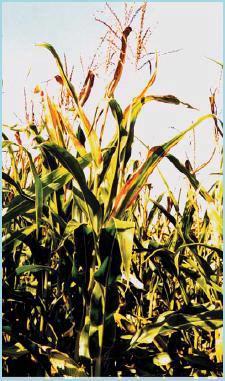
Figure 11. Anthracnose top-die back of corn. The top nodes of the stalk, the leaves and the tassel dry out but the bottom leaves and stalk remain green.
This disease is becoming more severe in Canada. The fungus survives in corn debris, infected seed, and some weed species. For stalk rot, the fungus infects plants through the roots or by rain splash onto stalks. Spores can also infect through wounds on the stalk or leaves. Insects may also carry spores into wounds. Like most stalk rots, occurrence is strongly linked to stress during grain filling and often infections can be traced back to wounding of the stalk by boring insects.
Use resistant hybrids; resistance to both the stalk and leaf blight forms are not necessarily found in the same hybrid. Clean ploughing may reduce inoculum levels. Crop rotation is essential especially in reduced tillage areas. Balanced soil fertility is important to control this disease. Control of the corn borer will reduce entry of the pathogen through feeding sites. Fields should be scouted 40 days after pollination by looking for symptoms and pinching stalks. When pinched, infected stalks are easily compressed or crushed. Fields should be harvested as early as possible if more than 10-15% of the stalks have rot since rotted stalks will lodge, making harvest difficult.
Pythium Stalk Rot
Causal Organism: Pythium aphanidermatum (Edson) Fitzp. (= P. butleri L. Subramanian) and other Pythium species.
A typical symptom of pythium stalk rot before flowering is a decay of the first internode above the soil (Fig. 12). Infected stalks may have a strong odour. Damaged internodes may twist and plants will fall over but the plant can remain green for several weeks. After the milk stage of plant development, the roots and several lower internodes become water-soaked and decay, resulting in early plant death.
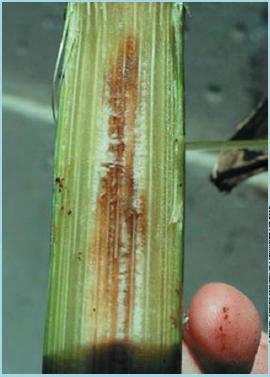
Figure 12. Pythium stalk rot.
This disease can occur any time during the season, especially when conditions are warm and wet. The fungus overwinters in the soil and plant debris as oospores that germinate and produce mycelium or mobile zoospores, both of which can infect corn plants.
Use resistant hybrids to control this disease. Stress factors such as unbalanced fertilization, high plant populations, use of unadapted hybrids, insects, weeds, poor drainage and infection by leaf diseases may increase plant susceptibility. Fields should be scouted 40 days after pollination by looking for symptoms and pinching stalks. Infected stalks are easily compressed or crushed when pinched. Fields should be harvested as early as possible if more than 10-15% of the stalks have rot since rotted stalks will lodge, making harvest difficult.
Ear Diseases
Gibberella Ear Rot (Pink Rot, Red Rot)
Causal Organism: Fusarium graminearum Schwabe [sexual state: Gibberella zeae (Schwein.) Petch].
The typical symptom of gibberella ear rot is a pink-to-reddish coloured mould, often starting at the ear tip or from an insect wound and growing down the ear (Fig. 13). Cobs can become quite spongy and husks become bleached and adhere tightly to the kernels. A powdery, cottony-pink mould may form later. Black coloured perithecia (fungal fruiting bodies that produce sexual spores) may be visible on husks.
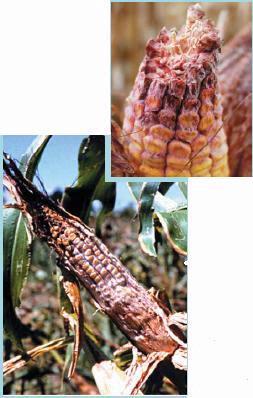
Figure 13. Typical mould growth on an ear of corn infected with gibberella ear rot. Mould colour is usually pink to reddish and often starts from the tip of the ear and spreads downward or from an insect/bird wound.
This is one of the most economically important ear rotting agents in Canada. The pathogen survives in soil and on crop residue; spores are produced in wet weather and dispersed by wind, rain splash and insects or birds. Infection takes place through the silks or through wounds created by birds or insects. Silks are highly susceptible 2-6 days after silking; kernels are susceptible until they reach physiological maturity. Infected ears are contaminated with mycotoxins such as deoxynivalenol (DON, vomitoxin) and zearalenone, which are highly toxic to livestock, especially swine, and humans (see Moulds and Mycotoxins section). Gibberella ear rot is favoured by cool, wet weather shortly after silking.
Hybrids with acceptable resistance are not yet available. Since this fungus also causes scab in wheat, corn should not be rotated with wheat or other cereals susceptible to scab if this disease is present. Hybrids with tight husk coverage and upright ears tend to get less infection. Crop rotation and fall tillage will reduce crop debris and thus may reduce disease levels in the next season. Insect control will reduce symptoms, especially with the use of Bt hybrids. Fields should be scouted as the corn begins to dent; if mould problems are identified, these fields should be harvested as soon as possible to prevent further mould growth.
Fusarium Ear and Kernel Rot
Causal Organisms: There are three main species responsible for fusarium ear and kernel rot: Fusarium verticilliodes [= Fusarium moniliforme J. Sheld. (sexual stage: Gibberella moniliformis Wineland)]; F. proliferatum (T. Matsushima) Nirenberg (sexual stage: G. fujikuroi var. intermedia Kuhlmann); and F. subglutinans (Wollenweb. & Reinking) Nelson, Toussoun and Marasas (sexual stage: G. subglutinans Nelson, Toussoun and Marasas).
The typical symptom of fusarium kernel or ear rot is a whitish to pink coloured mould, often starting at the ear tip or butt of the ear, commonly from an insect wound. Fusarium verticilliodes symptomatic kernels tend to be randomly scattered on the ear (Fig. 14) unlike other ear rots that spread from an initial point of entry. Infected kernels may also exhibit a “starburst” symptom in which white streaks radiate from the point of silk attachment to the kernel. Husks may become bleached and adhere tightly to the kernels. Black coloured perithecia (fungal fruiting bodies that produce sexual spores) may be visible on husks.
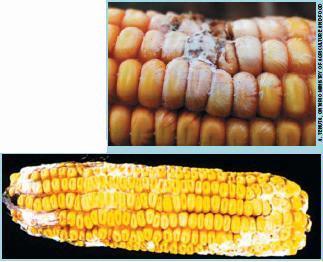
Figure 14. Characteristic spotty mould growth associated with Fusarium kernel rot caused by Fusarium verticilliodes. Mould colour is usually white and randomly distributed on the ear.
This disease is more important in the warmer, dry areas of Canada such as southern Ontario. The pathogens survive in soil and on crop residue; spores are produced in wet weather and dispersed by wind, rain splash and insects or birds. Infection takes place through the silks or through wounds created by birds and/or insects. There is also evidence that F. verticilliodes can invade the ear by systemic infection from the stalk. Infected ears may be contaminated with mycotoxins such as fumonisins, which are highly toxic to livestock, especially horses, and humans.
No hybrid with acceptable level of resistance is available yet. Control strategies are similar to those for gibberella ear rot.
Diplodia Ear Rot
Causal Organism: Diplodia maydis (Berk.) Sacc. [= Stenocarpella maydis (Berk.) Sutton].
With Diplodia ear rot, infected husks become dry and bleached but the rest of the plant remains green. Eventually, the husks and kernels become covered with a white to grayish brown coloured mould (Fig. 15). Kernels appear glued to the husks and cob by white mycelium. Infected ears are light and shrunken. Black pycnidia (fungal fruiting bodies that release asexual spores) look like small raised black bumps on husks and kernels forming late in the season. If infection occurs several weeks after flowering, symptoms are much less apparent but close inspection of the ear will reveal white mycelial growth between the kernels. Symptoms are most severe if infection occurs just after silking.
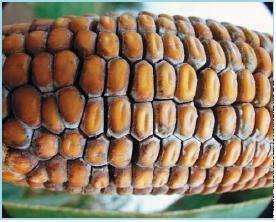
Figure 15. Diplodia ear rot covers kernels with whitish/grayish mould.
This disease is not as common as gibberella or fusarium ear rot. Diplodia maydis overwinters on corn debris so the incidence is increasing with the increased use of conservation tillage. The disease is most severe when corn follows corn in rotation, especially if conditions are wet after silking. The pycnidia on the debris produce spores that are splashed onto the silks and then grow down the silks into the ear. This fungus can also penetrate the husks especially at the base of the ear. Birds and insects may also vector the disease and create wounds on the ear for easy fungal entrance. Infection is favoured by cool, wet weather during grain fill.
For control, use hybrids with some resistance. Hybrids with tight husk coverage and upright ears tend to get less infection. Crop rotation and fall tillage are important in reducing crop debris and thus disease levels in the next season. Fields should be scouted as the corn begins to dent; if mould problems are identified, these fields should be harvested as soon as possible to prevent further disease development.
Common Smut (Boil Smut, Blister Smut)
Causal Organism: Ustilago zeae (Beckm.) Unger [ = U. maydis (DC.) Corda].
Symptoms can occur on all plants parts above the ground, especially young and actively growing plant tissues. Large 2–10 cm (1–4 in) galls (swollen, distended growths) are formed on stalks (Fig. 16), tassels and ears (Fig. 17). The galls are first covered by a silvery-white membrane, which changes to a grey mass containing black powdery spores. When mature, these galls will erupt and release black spores. Galls may also form on leaves but are generally small, brown and hard (Fig. 18). Early infection may kill young plants. Plants with large galls on the lower stalks may be stunted, barren or produce small ears. Infection of ears is usually from spores germinating on the silks and mycelia growing down the silks to infect the kernels.
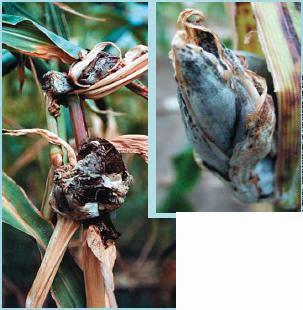
Figure 16. Common smut galls on the nodes of a corn stalk. Galls will eventually erupt to reveal masses of black spores.
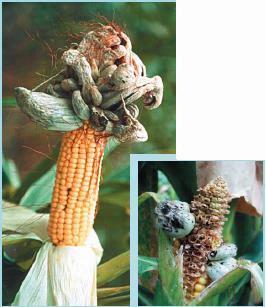
Figure 17. Corn ear severely infected with common smut. Galls will eventually erupt to reveal masses of black spores.

Figure 18. Common smut galls on corn leaves and sheaths. These galls are much smaller than those that form on stalks and ears and rarely erupt to release spores.
Common smut is found in most corn growing regions of Canada. Black teliospores of the pathogen overwinter in soil or crop debris and can survive for several years. Initial infections occur from wind-borne or water-borne spores in the spring. Spores from galls on the plants can infect other plants. Infection can occur through unwounded tissue, but wounds caused by insects, cultivation, hail or blowing soil are important sources of fungal entry. The fungus favours high temperatures of 26–34°C (79–93°F). There is no consensus on whether smut favours humid or dry conditions. During combine harvesting, spores are spread locally by the wind. Spores can also be spread from field to field by contaminated farm equipment.
For control, use resistant hybrids and avoid mechanical injury to plants. Destruction of galled plants is useful where feasible. Crop rotation will reduce disease severity in the following season. Maintain balanced soil fertility since high nitrogen and manure applications will promote vigorous plant growth making the plant more susceptible; phosphate fertilization tends to decrease incidence. Herbicide injury will also promote infection.
T. FORGE
Agriculture and Agri-Food Canada, Agassiz, BC
What are plant-parasitic nematodes?
Nematodes are translucent, microscopic roundworms, typically measuring 0.25 to 1 mm (0.01 to 0.03 in) in length and only about 0.01 to 0.03 mm (0.0004 to 0.001 in) in diameter. Most nematodes are beneficial components of the soil ecosystem because they feed on bacteria, fungi and other micro- invertebrates, helping to cycle nutrients. Their abundance ranges from about 1000 per liter (4,000 per gal) of degraded or infertile soil up to 50,000 per liter (200,000 per gal) of highly fertile soil. However, over 60 nematode species parasitize corn roots and some of these species are economically important pathogens (1).
The effects of parasitic nematodes on production of grain corn have been well studied (1, 2, 3). The groups of species most likely to cause damage to corn in temperate regions of North America include: root-lesion nematodes (Pratylenchus spp.), root-knot nematodes (Meloidogyne spp.), needle nematodes (Longidorus spp.), sting nematodes (Belonolaimus spp.) and stubby-root nematodes (Paratrichodorus spp). All plantparasitic nematodes have piercing-sucking mouthparts called stylets, which they use to puncture the cell walls of fine roots and extract cellular contents (Fig. 1). The needle and sting nematodes have particularly long stylets and feed only on cells that can be reached from outside the root; these nematodes are known collectively as ectoparasites. Other groups, including the root-lesion nematodes, completely enter root tissue and move from cell to cell within the root as they feed; these nematodes are known as migratory endoparasites. The rootknot nematodes are sedentary endoparasites which establish permanent feeding sites within the root tissue, sometimes forming swellings known as galls. These nematodes will complete most of their life-cycle, including laying eggs, while feeding from only one or a few root cells.
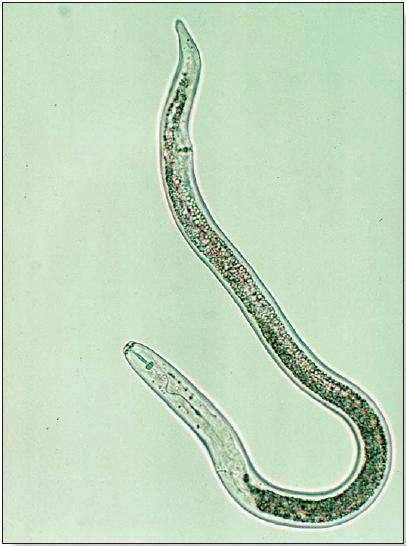
Figure 1.
Unfortunately, very little is known about the influences of plant-parasitic nematodes on production of silage corn, so most of the information in this article refers to research on grain corn production. Annual yield losses in grain corn were estimated to be as high as 4% in Iowa and 7% in Georgia (4).
Much of the crop damage caused by plant-parasitic nema todes is overlooked because the above-ground symptoms of nematode damage are non-specific and difficult to distinguish from other factors. Because high densities of nematodes usually exist in patches, nematode damage is often observed as patches of poor, sometimes chlorotic, growth within large otherwise uniform fields (1, 2, 3). Patches of high nematode population densities may be caused by other soil factors that may also affect crop growth. For example, some nematodes reach higher populations and cause more damage in coarse than in fine-textured soils. As a result, poor crop growth observed on sandy soils can be the result of low water or nutrient availability as well as nematode damage. That nematode damage does not always appear in patches further complicates interpretation of symptoms in the field.
Symptoms of nematode damage to roots are also relatively general and difficult to distinguish from those of other pathogens or even other environmental factors. The root-knot nematodes are the exception as they cause distinctive swellings on roots called galls or knots. Root-lesion nematodes cause general symptoms that range from many small lesions on young fibrous roots to abnormal darkening and complete necrosis of root tissue. The ectoparasites (needle, stubby and sting nematodes) tend to reduce root growth at the tips, causing a “stubby” appearance. The intensity of the symptoms of nematode damage may be enhanced by other factors such as secondary pathogens (i.e. fungal pathogens), which can also produce similar symptoms.
Nematicides often improve crop growth. However, it is difficult to make direct links between the benefits of nematicides and the pathogenicity of nematodes, because nematicides can affect crop growth in other ways. For example, use of nematicides on a mixed nematode community including P. brachyurus alleviated symptoms of zinc deficiency on young corn plants (5). Nevertheless, a number of detailed greenhouse (6, 7) and field studies (8) in which nematodes were manipulated independently of other potential soil pests have confirmed the pathogenicity of root-lesion nematodes to corn.
To determine if plant-parasitic nematodes are contributing to poor crop production, soil samples should be analyzed by a qualified nematology laboratory. In the U.S, most land-grant state universities or cooperative extension centres have plantdisease diagnostic clinics with nematology expertise (or can forward samples to a nematology lab). In Canada, there is limited access for producers to diagnostic labs with adequate expertise in plant-parasitic nematodes.
Sampling strategies and interpretation of the data depend on the nematode species suspected and environmental conditions, and should be developed in consultation with the diagnostic laboratory. Populations of all nematode species vary seasonally (9, 10, 11). In particular, the distribution of migratory endoparasitic nematodes between roots and soil varies with season (9, 11), necessitating analyses of sub-populations in both soil and roots. Only soil samples are required for analyses of populations of ectoparasites.
To analyse samples, first the nematodes are extracted from soil and plant tissue, then they are identified and counted. The absence of recognized nematode pathogens of corn in diagnostic samples can be used to rule out nematodes as the cause of poor crop growth. However, the presence of large populations of one or several species of recognized pathogens should not be interpreted as proof that the poor growth is due exclusively to the nematodes. Likewise, it is difficult to relate nematode population densities quantitatively to yield loss because nematodes interact strongly with other factors, particularly water and nutrient availability and other pathogens.
Nematodes of particular interest for corn production in temperate regions
Root-lesion nematodes (Pratylenchus spp.)
Globally, root-lesion nematodes are the most common nematode pests of corn and several species in this group cause significant damage (1, 2, 3). In the Midwestern corn belt of the U.S., the most important species are P. hexincisus, P. penetrans and P. scribneri while in the southeastern U.S. and other warm-temperate to subtropical regions, P. zeae and P. brachyurus are most common (3).
Fibrous roots invaded by root lesion nematodes develop several dark lesions, which may expand into one another to girdle roots and cause sloughing of cortical tissue (1, 2, 3). Symptoms in the field range from localized patches of stunted and chlorotic plants to general suppression of growth throughout a field (1, 2, 3). In Iowa, P. hexincisus populations under 1,000 per g (30,000 per oz) of dry root had no effect on yield but densities greater than 5,000 per g (150,000 per oz) of dry root significantly reduced yield (1). Application of nematicides increased yields by 26% (12). In South Dakota, yield losses of dryland corn (grain) due to P. hexincisus averaged 600 kg/ha (9.5 bu/ac) at typical mid-season populations of 3,400 per g dry root (100,000 per oz), while yield losses of irrigated corn to P. scribneri were somewhat lower at 250 kg/ ha (4 bu/ac) with mid-season populations of 8,200 per g (250,000 per oz) of dry root (13). Todd and Oakley (14) increased yield of grain corn by 1% for each 1000 root-lesion nematodes per g dry root they eliminated with a nematicide. In contrast, nematicide did not increase yield of corn grown on soils infested with P. penetrans and P. crenatus in Prince Edward Island (15).
Root-lesion nematodes appear to be particularly damaging in the southeastern U.S. P. zeae, which is limited primarily to the southeastern U.S., reduced growth of young corn plants in a greenhouse experiment by 11 to 38% depending on population densities (7). In Georgia, a root-lesion nematode population of 650 per liter of soil (2,500 per gal) measured before planting reduced yield by 1.2 t/ha (19 bu/ac) and doubling the nematode population also doubled the yield loss. In North Carolina counts in the autumn exceeding 1,000 nematodes per liter (4,000 per gal) of soil are indicative of moderate damage (3).
Root-knot nematodes: (Meloidogyne spp.)
Three root-knot nematodes, M. incognita, M. arenaria and M. javanica can cause damage to corn in warmer temperate regions, and have been the focus of much recent study in the southeastern U.S. (3). In the irrigated areas east of the Cascade mountains in the Pacific Northwest (PNW) and northern California, corn is a host for M. chitwoodi. While the effect of this species on corn is unclear, the species is a severe pathogen of potato, which limits opportunities for rotating corn with potato. M. chitwoodi has not been detected in BC or coastal areas of the PNW. Corn is not a host for M. hapla, the most ubiquitous species of Meloidogyne in northern temperate agricultural soils (16) nor M. naasi, a significant pathogen of other cereals and grasses in northern temperate regions (16).
Stubby root nematodes (Paratrichodorus spp.)
Stubby root nematodes are found almost exclusively in sandy soils where they prefer wet conditions (17, 18). As a consequence, they are often abundant and problematic in irrigated, sandy soils. The species affecting corn most widely appears to be P. minor, recognized in the southeastern U.S. for causing significant yield losses in the 1970’s and 1980’s (3). More recently, P. minor infestations have declined in the southeastern U.S., possibly due to the more widespread use of non-fumigant nematicides (3). Because P. minor is a poor competitor with other plant-parasitic nematodes, its decline in the southeastern U.S. could be due also to increased abundance of other species of nematodes (3). We have found P. minor in soils of both coastal and interior British Columbia, but in the irrigated sandy soils of the Columbia basin of eastern Washington and Oregon, the dominant species is P. allius. The stubby root nematodes are vectors of tobacco rattle virus, which causes a severe disease of potato known as corky ringspot. Therefore, as with M. chitwoodii, growth of stubby root nematode on corn where tobacco rattle virus is present may limit opportunities for rotating corn with potato.
Sting nematodes (Belonolaimus spp.)
Sting nematodes (primarily B. longicaudatus) are among the few nematodes that can cause patches of complete yield loss in severely infested fields so nematicides can increase yield by 75% or more (19). Sting nematodes are not a problem north of Nebraska, and even in the southern Midwest and southeastern states, their occurrence is limited to sandy soils.
Controlling Parasitic Nematodes
Chemical:
Despite the likelihood of widespread yield losses of corn to nematodes, relatively little effort has been devoted to chemical management of these pathogens. There is evidence that seed treatment with nematicide reduces infection of corn roots by the root-lesion nematode (20). But, because nematode damage results typically in low-level chronic losses (e.g.
Cultural practices:
Several studies have demonstrated that minimum till reduces populations of root-lesion nematodes relative to conventional tillage (3) although the opposite has also been reported (21). The mechanisms by which minimum tillage affects this nematode are not known.
Populations of plant-parasitic nematodes generally increase with crop nitrogen status. For example, Forge et al. (22) found that long-term use of both manure and N-fertilizer increased population densities of root-lesion nematodes in tall fescue. While the benefits of fertilization will likely offset any negative effect of increased nematode populations, these nematodes may diminish the efficiency of uptake of N by the crop. The overall interactions between nutrient applications, plant-parasitic nematodes, and growth of corn needs further study.
Crop resistance:
Development of corn hybrids with nematode resistance has great potential because corn is widely grown in many countries, resistant crops require less inputs of costly chemicals or equipment, and the use of resistant cultivars is best for the environment (3). Also, where corn is grown in rotation with nematode-susceptible crops (e.g. potato), resistant corn varieties can be beneficial for the entire crop rotation. Commercial lines of corn resistant to root-knot nematodes have been released (3) and corn germplasm with resistance to root lesion nematodes has been discovered. Also, inbred lines with resistance to two species of root-lesion nematodes have been released (23, 24). Nonetheless, commercial corn seed companies consider development of resistance to plant-parasitic nematodes a low priority.
Do we need more nematode research?
If nematodes do not cause sufficient yield loss to warrant expensive control measures such as nematicides – do we need further research on nematodes in corn? The impacts of plantparasitic nematodes are likely under-estimated because they are non-specific, subtle and chronic. Since nematode effects can easily be mistaken for poor nutrient availability or damage from other pests, farmers may mistakenly apply extra fertilizer or pesticides to attempt to correct the problem. Further, the expansion of nematode populations in corn crops may impact succeeding rotation crops.
References
- Norton, D.C. 1983. Maize nematode problems. Plant Disease 67, 253-256.
- Norton, D.C. 1984. Nematode parasites of corn. pp 61-94 in: Plant and insect nematodes, W.R. Nickle (ed), Marcel Dekker, New York.
- Windham, G.L. 1998. Corn. pp 335-357 in: Plant and Nematode Interactions, Agronomy Monograph no. 36. American Society of Agronomy, Madison, WI.
- Society of Nematologists Crop Loss Assessment Committee 1987. Bibliography of estimated crop losses in the United States due to plant-parasitic nematodes. Annals of Applied Nematology 1, 6-12.
- Minton, N.A., M.B. Parker and D.R. Sumner 1985. Nematode control related to Fusarium wilt in soybean and root rot and zinc deficiency in corn. Journal of Nematology 17, 314-321.
- Dickerson, O.J., H.M. Darling, and G.D. Griffin 1964. Pathogenicity and population trends of Pratylenchus penetrans on potato and corn. Phytopathology 54, 317-322.
- Tarte, R. 1971. The relationship between pre-plant populations of Pratylenchus zeae and growth and yield of corn. Journal of Nematology 3, 330-331.
- Olthof, T.H.A., and J.W. Potter 1973. The relationship between population densities of Pratylenchus penetrans and crop losses in summer-maturing vegetables in Ontario. Phytopathology 63, 577-582.
- MacGuidwin, A.E. 1989. Distribution of Pratylenchus scribneri between root and soil habitats. Journal of Nematology 21, 409-415.
- MacGuidwin, A.E. and T.A. Forge. 1991. Overwinter survival of Pratylenchus scribneri. Journal of Nematology 23, 198 204.
- Vrain, T.C., T.A. Forge and R. DeYoung 1996. Population dynamics of Pratylenchus penetrans parasitizing raspberry. Fundamental and Applied Nematology 20, 29-36.
- Norton, D.C., and P. Hinz 1976. Relationship of Hoplolaimus galeatus and Pratylenchus hexincisus to reduction of corn yields in sandy soils in Iowa. Plant Disease Reporter 60, 197-200.
- Smolik, J.D., and P.D. Evenson 1987. Relationship of yields and Pratylenchus spp. populaton densities in dryland and irrigated corn. Annals of Applied Nematology 1, 71-73.
- Todd, T.C., and T.R. Oakley 1996. Seasonal dynamics and yield relationships of Pratylenchus spp. in corn roots. Journal of Nematology 28(S), 676-681.
- Kimpinsky, J., L.S. Thompson, R.P. White and C.B. Willis 1977. Nematodes in field corn in Prince Edward Island. Can. J. Plant Sci. 57, 323-330.
- Rivoal, R. and R. Cook 1993. Nematode pests of cereals. pp. 259-303 in Plant-parasitic nematodes in temperate agriculture. Evans, Trudgill and Webster (eds.), CAB Int., Wallingford, UK.
- Winfield, A.L. and D.A. Cooke 1974. The ecology of Trichodorus. Pp. 309-342 in: Nematode Vectors of Plant Viruses, Lamberti, Taylor and Seinhorst (Eds), Plenum press, London.
- Bell, N.L. and R.N. Watson 2001. Dynamics of sympatric Paratylenchus nanus and Paratrichodorus minor populations in soil under pasture. Nematology 3, 267-275.
- Dickson, D.W., and T.E. Hewlett 1987. Effect of two nonfumigant nematicides on corn grown in two adjacent fields infested with different nematodes. Annals of Applied Nematology 1, 89-93.
- Chiba, M., G.J. Fulop, B.D. McGarvey and J.W. Potter 1993. Distribution and persistence of oxamyl in relation to root-lesion nematode control following seed treatment of corn. Journal of Agricultural Food Chemistry 41, 2160- 2163
- Yeates, G.W., and K.A. Hughes 1990. Effect of three tillage regimes on plant and soil nematodes in an oats/maize rotation. Pedobiologia 34, 379-387.
- Forge, T.A., S. Bittman and C.G. Kowalenko 2005. Impacts of sustained use of dairy manure slurry and fertilizer on populations of Pratylenchus penetrans under tall fescue. J. Nematology 37, (under review).
- Wicks, Z.W., J.D. Smolik, M.L. Carson and G.G. Scholten 1990a. Registration of SD101 parental line of maize. Crop Science 30, 242.
- Wicks, Z.W., J.D. Smolik, M.L. Carson and G.G. Scholten 1990b. Registration of SD102 and SD103 parental line of maize. Crop Science 30, 242-243.
M. BETTS
British Columbia Ministry of Agriculture, Food and Fisheries, Victoria, British Columbia
Effective and economical weed control requires a good knowledge of the many available weed management tools. Corn in the 3- to 8-leaf stage is very susceptible to competition and needs to be relatively free of weeds; after the 8-leaf stage, corn becomes much more competitive so there is little value in controlling new weeds after this stage. How do you get corn to the 8-leaf stage as safely as poss ible?
Tillage for Weed Control
Tillage remains an effective tool for controlling weeds, and is especially useful where herbicide resistance in weeds has developed. Cultivating to kill weeds without injuring the corn requires careful control of cultivation timing and depth.
Timing cultivation
Early cultivation is very important because as weeds develop deeper roots with more food reserves, they increasingly resist and recover from mechanical damage. Also, the longer weeds are allowed to grow, the more nutrients and water they take from the crop.
Cultivation before planting.
In early spring, planting can be delayed slightly to allow weed seeds time to germinate. A shallow cultivation immediately before planting will destroy newly germinating weeds that are not easily noticed.
Cultivation after planting.
Cultivation after planting can be very effective but requires special equipment. A light harrow can be used up to early corn emergence. A rotary hoe can be used until corn plants are 10-12 cm (4-5 in) tall (Fig. 1). After the plants are 15 cm (6 in) tall, inter-row cultivation is the only tillage option. When using the harrow or the rotary hoe, it is vital to control weeds when they are very young.
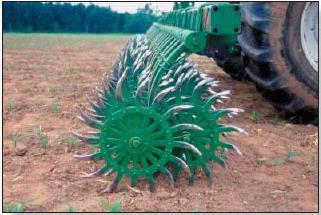
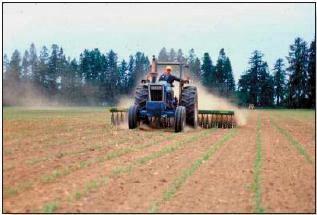
Figure 1. Rotary hoe
Cultivation Equipment
Harrow
A light harrow can be used to control newly germinating annual weeds in corn planted 2-5 cm (1-2 in) deep. Shallow harrowing is done after the corn has sprouted but before the shoot has emerged from the ground, and when weeds at the soil surface have germinated but are still very small with few roots. The harrow should be light so the teeth will not cause crop damage but will dislodge or bury most of the newly sprouted weeds. Shallow harrowing will:
- bring few new weed seeds to the soil surface
- result in little loss of soil moisture
- cause little damage to corn roots
- require low tractor power.
Rotary hoe
The rotary hoe (Fig. 1) is generally more effective than the harrow. The rotary hoe has two gangs of closely mounted spiked wheels which lift a thin surface layer of soil that contains the small weeds while the implement is pulled at high speed (generally 10-20 km/h or 6-12 mph) across the field.
The small weeds are either buried or flipped out onto the soil surface to die. For the operation to be most effective, weed seedlings must be in the ‘white sprout’ stage when they are quite difficult to see; if the field shows a green tinge from weed growth, you are likely too late to get most effective weed control. Best results are obtained on dry soils in the middle of the day when the uprooted weeds are likely to dry out; wet soils and rainfall reduce effectiveness. Corn and other large seeded crops, planted about 5 cm (2 in) deep, are not damaged by the rotary hoe until plants reach a height of about 10-12 cm (4-5 in). however, note that hoeing should be avoided when the corn spike is still underground but close to the soil surface because loose soil can damage the plant by covering it; wait until the first leaf has emerged.
A common mistake is delaying the first hoeing operation. The first pass should be made 3-5 days after the last tillage and the second pass about 5-7 days later.
Another valuable use for the rotary hoe is to break soil crusts on newly planted fields, helping the crop to emerge. Crusting may occur on silt or clay soils after heavy rainfall.
Inter-row cultivator
Inter-row cultivation is especially helpful after herbicide application, when suppressed weeds have started to regrow or new weeds have germinated. There are many styles of inter-row cultivators and most can be modified with various types of shields and sweeps. Depth wheels with precise height adjustment are necessary to maintain accurate, shallow tillage. For implements using several cultivator sweeps per row, sweeps should be spaced to provide up to 50% overlap. Success with inter-row cultivation depends on field conditions and weed stage as well as the design and quality of the cultivator and the skill of the operator in setting-up and operating the equipment. Inter-row cultivation controls weeds between rows but may also help to control weeds in the rows. Within-row weed control can be achieved by covering the weeds with soil thrown into the row while protecting the corn with shields. For this to work, the corn must be tall enough and weeds small, criteria which are not always met. For improved effectiveness of an inter-row cultivator, consider the addition of a tractor steering guidance system. Precision steering will improve weed control and reduce damage to the corn by allowing for fine-tuning of the cultivator. It also enables higher speed of operation and minimizes stress on the operator.
Weed control in Minimum-till
Controlling weeds in no-till systems presents particular challenges and generally increases dependence on herbicides. Weed populations tend to shift because the change in tillage impacts underground parts of perennial weeds and the movement of weed seeds within the soil profile. With conventional tillage, weed seeds are moved down the soil profile where they may remain dormant for long periods thus increasing the life of seeds and prolonging some weed problems. With no-till, most weed seeds remain on the surface where they are damaged by weathering or consumed by insects, birds and rodents. Perennial weeds however, can become more problematic with no-till systems and should be controlled with pre-plant or pre-emergence burn-down treatments. Use of post-emergence herbicides may also be necessary.
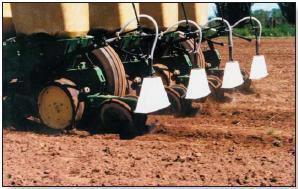
Figure 2. Band sprayer mounted on corn planter
Herbicides for Weed Control
There are many herbicides and mixtures of herbicides registered for use in corn. For effective weed control with herbicides, it is essential to:
- Identify weeds before selecting herbicides. It is useful to record weed problems and refer to records the next year when selecting pre-plant incorporated and pre-emergence herbicides.
- Change herbicide groups (see below) frequently so you do not build up populations of herbicide tolerant weeds.
Read the label and follow directions — it’s the law. Reading and understanding the herbicide label, especially before you are in the field, helps to prevent costly mistakes and improves results. - Frequently monitor corn and weed growth stages when using post-emergence herbicides. As weeds get older, they become more resistant to herbicides. Avoid spraying postemergence herbicides after the optimum growth stage outlined on the label.
- Consider economic thresholds. It may not be economic to control all weeds. Weed species vary in their ability to compete against corn, but generally weeds that emerge early cause greatest yield reductions. For example, redroot pigweed plants that emerged when corn was in the 3-leaf stage suppressed corn at populations of 1 plant per 2 m (2 yd) of corn row. In contrast, pigweed that emerged when the corn was at the 6-leaf stage did not cause yield reductions even at populations of 4 pigweed plants per m (yd) of row. This shows that early identification and control of weeds is important.
Herbicide Application
A major concern with herbicide application is drift onto non-target areas. Drift refers to the movement of droplets or vapours by wind or air currents. Herbicide drift results in reduced weed control, damage to neighbouring crops and pollution of the environment. Buffers (setbacks) are required to protect sensitive areas downwind of the application, such as watercourses, shelterbelts, hedges, woodlands, or wildlife habitat. Follow instructions about buffers that may be outlined on the herbicide label, and use drift reducing equipment.
Spraying Equipment
Boom sprayers
Boom sprayers are designed to uniformly and accurately spray herbicides to the ground or weeds across the full width of the boom. For effective application, the equipment must be frequently maintained, calibrated and monitored. It is not uncommon to find application equipment significantly over-applying herbicide. This will result in unnecessary expense, possible crop damage or herbicide residue buildup and potential pollution. Underapplication may force a second herbicide treatment for adequate weed control or could result in the development of herbicide resistant weeds.
Band sprayers
Although herbicides are usually applied with boom sprayers, consider banding herbicides. Banding saves time and reduces the amount of herbicide used. Band applicators can be attached either to planters or cultivators.
Planter sprayers are used for pre-emergence herbicides at planting time. Band sprayers attached to the row-crop cultivator are used to apply herbicides after the corn emerges. Spray nozzles for banding equipment must apply a uniform rate of spray across the pattern of each individual nozzle (even-spray nozzles). When banding with row-crop cultivators, it may be necessary to use nozzles that have a narrow pattern (20-30 degrees) so that the tips can be raised high over the crop. For precise control of height, nozzles may be mounted on skids. ‘Crop leaf lifters’ can help reduce herbicide contact with the corn plants while increasing the exposure of weeds.
The Peril of Herbicide Resistant Weeds
Pests are continually acquiring resistance to chemical agents such as insecticides, fungicides, antibiotics and herbicides. Herbicide resistance is the ability of a plant or population of plants to survive a normally lethal dose of the herbicide. Herbicide resistance within a weed population is relatively rare, but when it does occur, the resistant plants are able to grow and multiply. Generally, resistance is most common in annual weeds because of the massive numbers of seeds they produce. According to the Weed Science Society of America there are over 170 weed species found in 270,000 fields throughout the world that have acquired herbicide resistance. These numbers continue to grow.
How to prevent herbicide resistance
Herbicide programs should be designed to minimize risk of developing resistance. Herbicides can be grouped by their mode of action. For example, herbicides in Group 5, which include the triazines (like atrazine), work by inhibiting photosynthesis at a particular biochemical site. The commonly used herbicide 2,4-D is in Group 4, which works as a synthetic growth regulator. When herbicides in the same Group are used in the same field for a number of years, one or more weeds may survive and multiply. Seed of these resistant weeds may remain viable in the soil for many years.
Following are some tips to help reduce build up of herbicide resistant weeds:
- use non-chemical weed control practices such as tillage.
- use herbicides only when necessary.
- don’t use herbicides from the same herbicide Group every year, and choose products from different Groups when mixing herbicides
- don’t reduce application rates below label rates
- use herbicides with a short residual life. Most cases of resistance have occurred with persistent chemicals (e.g. atrazine).
- keep records so you know what herbicides have been used in previous years
Some problem weeds in corn
Following are weeds that are common problems in corn production in many regions. Remember, proper identification is essential to develop an effective weed management plan.
** insert weed photos here.
Tips for fighting weeds
- Walk your fields frequently; destroy patches of weeds so they cannot produce seeds that might remain viable in the soil for years. Monitor the infested area in future years.
- Prevent weeds from arriving in your farm as seeds or vegetative propagules in manure or on equipment (your own or your custom operator’s). While complete prevention is impossible, you can dramatically reduce importation.
- Destroy germinating seeds and young weeds just before planting, using tillage or broad-spectrum herbicides, to give your crop a head start.
- Correct soil nutrient deficiencies for fast early growth, and avoid fertilizing the weeds. Applying starter fertilizers in bands 5 cm (2 in) beside and below the seed targets the young corn plants while limiting access to weeds.
- Select vigorous corn hybrids based on local information; corn hybrids vary widely in their early spring vigour.
- Plant early. Plantings have generally gotten earlier over the years, partly thanks to new hybrids that do well under cool climate and soil conditions. In BC, late April and early May plantings generally yield more than later plantings.
- Pay attention to planter maintenance, adjustment and calibration. Proper operation is essential to avoid gaps between seeds, uneven emergence, poor fertilizer placement, and inaccurate seed and fertilizer rates that give weeds an opportunity to grow and reduce corn yields. Excessive planting speed can result in poor seed placement and uneven stands.
- Rotate crops. Alternating crops reduces the build up of hard to control weeds (also disease and insects) and the risk that herbicide resistance will develop.
Leaf Stages of Corn
It is important to know the different techniques used for counting corn leaves in order to understand herbicide label directions.
- Leaf-tip method — count all the leaves including the newest leaf tip that may have emerged from the whorl at the top of the plant.
- Leaf-collar method — the leaf collar is a light-green band that separates the leaf blade and the leaf sheath (leaf sheath is the cylindrical part of the leaf that wraps around the corn stalk). Corn growth stages using this method are referred to as V1, V2, V3, etc., where V2 indicates a plant with 2 collars showing.
- Leaf-over method — counts all the leaves including the last leaf that has started to arch over. This usually happens when the leaf is about 50% emerged.
Remember that as plants get older, leaves at the bottom of the plant begin to die. All counting methods include dead leaves. It helps to know that the first leaf (the one closest to the bottom of the plant) is always short and has a rounded tip. So when assessing later growth stages after some of the bottom leaves have died, always look for the leaf with the rounded tip.
Tips for Sprayer Use and Maintenance
- Follow equipment and pesticide safety procedures.
- Ensure that nozzle spacing, spray pressure, spray output and pattern are uniform and accurate across the width of the boom. The need for frequent checks of nozzle pattern (plugged nozzles), uniform spray output and correct application rate cannot be over emphasized. Nozzles varying in output by more than 5% from the average need to be replaced
- The spray boom needs to be stable, with constant height of nozzles over the ground or weed canopy across the boom width. Nozzle height must be appropriate for the specific nozzles being used to allow for proper spray overlap and uniformity of application.
- Ground speed needs to be constant. Soft soil or hilly fields can cause significant variation in ground speed and corresponding errors in herbicide application rate. Application rates of sprayers having a constant pressure at the nozzle are directly affected by forward speed; if forward speed is reduced by 15%, then application rate increases by 15% with possible costly outcomes. Where variable ground-speed is a problem, ground-driven speedometers can be used to regulate flow-proportioning valves to deliver constant rates. More sophisticated sprayer monitors are now available that adjust sprayer output by determining ground speed with Global Positioning Systems (GPS). Remember that you are required by law to stay within the label application rate for each herbicide.
- Consider using specialized nozzles that reduce drift by creating fewer small ‘driftable’ spray droplets. Examples are ‘Extended Range’ and ‘Drift Guard’ nozzles that have been shown to reduce spray drift by producing larger droplets. The newer ‘Air Induction’ nozzles mix the spray liquid with air drawn through a small hole in the side of the nozzle. This produces a very coarse spray consisting of droplets that contain small air bubbles. These large droplets, which are less susceptible to drift, shatter on impact producing smaller droplets that spread over and remain on leaves instead of rolling off, as can occur with large droplets from regular spray nozzles.
- Clean and decontaminate your sprayer after use to prevent damage to subsequent crops. Use appropriate cleaning agents and detergents, as many newer herbicides (e.g. sulfonylurea herbicides) can cause crop damage at very low rates
